Sunday, November 26, 2017

German Chocolate Cake


German chocolate cake is my dad's favorite dessert.  So, when he visited for Thanksgiving, this had to be on the menu -- along with pumpkin and apple pie, of course. I researched a lot of recipes and ended up using the recipe from Tastes Better From Scratch. It does taste better than any other German chocolate cake I have ever had and this was confirmed by my dad who has tasted for more variations of this cake than I.


First I baked the chocolate cakes in spring form pans and then made the chocolate frosting. I just put chocolate frosting between the layers, but in the future I will try using the pecan coconut frosting in the middle in addition to the top as I had extra (and it's SOOOOOO good).


This chocolate frosting recipe was so nice and smooth. 


The pecan coconut frosting came together nicely. I thought it was going to be too runny at first, but it thickened nicely when it cooled down. 


I put the chocolate frosting between the layers and on the outside. I spread the pecan coconut frosting on top and then used the extra to pipe a little design around the sides.  

I typically do not like chocolate cake as it's drier than other cakes, but this cake was moist and flavorful. It was unlike any other chocolate cake recipe I have tried. 


Sunday, November 5, 2017

Brioche Loaves


In our household, my husband is usually the one making the bread.  But, I make the brioche.  I haven't made it for a few years though and the last time I made it, I recall it being an easier experience.  Perhaps it was that I had less distractions and was not multi-tasking as much as I seem to be now. 
We bought a loaf (for $11!!) at the farmers market a few weekends ago and I told myself that I would just make it myself next time.  Now, I know why they were selling it for $11 for a small loaf. I think I would sell the loaves I made for $50 as there is a lot of patience, care and TIME that is involved in making it.  It's SOooooo worth it though.

I used the Martha Stewart brioche loaf recipe. However, her recipe didn't indicate how to form the loaves, so while I kneaded the dough, I had fun watching a few brioche fanatics on YouTube.

I made the dough the day before, let it rise a few times and then let it sit overnight. I wasn't able to get to it right away the next day so it was left all day in the refrigerator until I had time to get to it in the evening. So, it was a bit sticky, but I worked with it to see what would come of it anyway.

I made one large loaf and two smaller loaves. One with the balls of brioche dough and one where I braided it slightly.

This is before rising:


And after rising:
(with how sticky the dough is, I was happy it did!)


They baked very nicely and the internal temperature read of 205 degrees was spot on.  While my dough was not as smooth this time, I was really happy with how they turned out (and taste!).  We have had brioche toast, brioche french toast, brioche sandwiches and with the remaining loaf, I'm planning to cut it up in cubes and save it to make stuffing for Thanksgiving.  How decadent will brioche stuffing be?!


Tuesday, October 31, 2017

Halloween Spiderweb Cupcakes


We were having a few friends over for Halloween night to have dinner prior to going out trick or treating so I wanted to make a fun dessert.  It's not that you need MORE sweets on Halloween, but I have been wanting to try piping chocolate decorations and thought I'd give this a try for the occasion. 

I made a different chocolate cupcake recipe that I found by Ina Garten as I wanted to do a glossy ganache on top. It was definitely a different cake recipe that called for no leavening or cocoa but Hershey's chocolate syrup instead? I was skeptical but gave it a try. They baked nicely and they were definitely more dense, but it was perfect to hold the ganache frosting and it didn't soak through after we dipped the tops in the glossy chocolate and heavy cream mixture. 


It was SO fun piping the white chocolate! I melted down Ghiradelli chocolate disks and put it in a quart size bag with the corner snipped off to make a piping bag. It worked well, but you need to work quickly before the white chocolate starts to solidify in the bag. 

I used a template for the spiderwebs that I found online and piped along the lines on wax paper.  I placed the cobwebs in the freezer to harden and continued with piping. I bought a bag of plastic spiders and decorated each one with a spider. 


I even had a little extra white chocolate so I tried my hand at piping a short "Boo!" on a few. 


They were a hit for dinner and enjoyed after a long walk around Georgetown for trick or treating. Happy Halloween! 


Saturday, September 30, 2017

Donut Birthday Cake


For Miss A's birthday, we decided on a donut theme. This theme all started with a sprinkled donut pinata that she found and begged to get for her party.  I went crazy from there - donut decorations, donut party favors and since it was a sleepover party, donuts for breakfast in the morning!

The cake was more work that it looks and than I thought, but it was so fun to make and the girls loved it.

She decided on funfetti cake for her donut which is quite fitting. I have to admit that I've never made funfetti cake from scratch. The few times I've made it, I would buy a box cake (the horror!?). But I refused to do that and now realize that all you need to do is dump a load of sprinkles in the batter and voila!...funfetti! I used the funfetti cake recipe from The Cake Blog and it worked really well. 


I bought a special donut shaped cake pan on Amazon so we could have the perfect giant donut cake. I filled each side with batter almost to the brim. 


Here it is after I took let it cool and took it out of the pan. The baked quite well and I just evened out the flat side by cutting it with a bread knife so the donut would fit together nicely. After I evened out the flat side, I scooped out a trough in the center of each side with a spoon to pipe in the filling.


I made a pink buttercream for the filling and a neutral buttercream for the outside of the donut. 


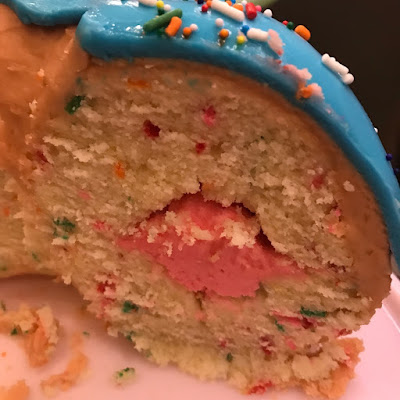
I forgot to snap a photo of the trough with the filling, but here it is all put together when you cut through it. The trough allowed room for the filling and I used a piping bag with a large round tip to fill it in with the pink frosting.


One I put both sides together (and hoped it would hold!), I set out to frost the outside of the donut. I did one crumb coat and a second coat to make sure it was covered.


After I put the cake in the refrigerator for 10-15 minutes, I smoothed out the buttercream with a warm knife (by periodically dipping it in hot water) to get the frosting nice and smooth like this. 


I made my homemade white chocolate marshmallow fondant and then kneaded in this bright blue color (Miss A's favorite color). I rolled it out nice and smooth to cut the "glaze" for the donut. I used the donut pan to make a template on parchment paper to guide me and then used a paring knife to cut it a little jagged to look like the glaze was dripping down the donut. 


I made a mixture of equal parts vodka (strange, right?) and corn syrup to brush on top of the fondant glaze so it looked glossy and immediately sprinkled the sprinkles all over it and it also helped them to stick on the glaze.


I got this cute sign from Etsy and the donut cake is complete (6 hours later). But, SO worth it when Miss A saw the finished product and her girlfriends came over all excited for the giant donut cake. 


We're decorated and ready for the party! 


"Happy birthday to you!"


SO yummy and fun slices of the donut. 


After a fun sleepover (and some sleep) we had glaze your own donuts for breakfast too.


Monday, August 14, 2017

Key Lime Tart


One of my favorite desserts (although there are a few), is key lime pie. I had made little key lime pie tartlets a long time ago and I was due to try making something with key limes again. We had a big family dinner this weekend and I wanted to make a nice summer dessert. I used an Epicurious recipe that called for both key lime juice and a touch of lemon juice. 

I started by making the graham cracker crust from scratch. You can buy graham cracker crumbs by the box, but I find it quite easy to crush graham crackers in a gallon Ziploc using a rolling pin. I pressed the crust into my tart pan and baked it as directed.


Then to make the key lime filling...and this is when I remembered why I had not made key lime anything for a while. The key limes are tiny - about the size of my thumb and I needed to squeeze more than one container of these little guys. 


I prepared the filling, poured it into the tart shell, baked it and let it cool. I wanted to use some whipped cream to put in top and looked into making stabilized whipped cream for the first time so it would hold its shape when I piped it.

I was fairly pleased with how it turned out and only hoped the crust would stay in tact when I removed the outside of the tart pan. 


Phew - it did...and yes, life is short, so eat dessert. I don't indulge too much or every day, but all in moderation.


I grated some key lime zest on the tart and cut a piece for each family member to enjoy. 


Sunday, August 13, 2017

Blueberry Muffins


I've typically always enjoyed making blueberry muffins with cornmeal. However, I came across this recipe for blueberry muffins with sour cream and thought I'd try it. I was up before the entire house one morning and started making them for breakfast. 


There's nothing like waking up on a Sunday morning to the smell of baking. Those are the kinds of memories at home that I want my daughter to remember - waking up to my smile greeting her and the smell of baking on a cozy weekend at home.


Wednesday, August 9, 2017

Triple Berry Pie


My colleague at the office loves pie so I set out to bake a perfect summer pie to take in for her birthday celebration. I had some blueberries, blackberries and raspberries on hand and they made the sweet summer triple berry pie. 

I first made a traditional pate brisee crust using the food processor.

Then I made the berry mixture and savoured the amazing jammy mixture that would fill the pie. 


Top crust went on and I used a spoon to make a simple patter around the edge of the pie. 


Triple Berry Pie


Ingredients:
Pate Brisee crust (split in two for a double crust pie)
7 C. fresh or frozen berries
1 C. granulated sugar
1T. lemon juice
4 T. cornstarch
2 T. butter
1 egg white beaten with a fork

Directions:

Add the berries, sugar and lemon juice to a large saucepan over medium heat. Simmer until they are warm and juicy, about 5-10 minutes. Spoon out about 1/2 C. of the juice from the pan into a bowl and mix in the cornstarch. Continue simmering the pot of berries and add in the cornstarch mixture slowly. Gently stir the mixture until thickened, about 2-5 minutes. Remove from heat and stir in the butter. 

Remove from heat and pour the mixture into an unbaked pie shell. Top with the second crust, finish the edge and prick the top for steam to escape.

Brush a thin layer of the beaten egg white on top of the crust and sprinkle with sugar.

Bake at 400 degrees for about 40 minutes. (check 1/2 way through and add foil to keep the crust from burning.

Cool slightly and serve with vanilla ice cream!


Wednesday, July 5, 2017

America's Birthday Cake


There are all kinds of themed 4th of July desserts, many using various fruits to emulate the American flag on a pie, sheet cake or other. I got a newsletter recently from Food 52, which I adore, and they had this amazing looking American Flag Cake recipe that I thought I just had to try. 

It was SO much fun to make. It wasn't quick or easy to make, but it was a lot of fun. I realized how time consuming it would be when they indicated it was five separate cakes to build this flag inside all these layers. 

I started on July 3rd in order to have this bad boy ready for America's birthday and finished it up in my day off on the 4th of July for us to enjoy after dinner that evening. 

I'm not used to using so much food coloring. I used Americolor gel food coloring and probably used a few drops more than the recipe even indicated. I felt like I was making Sesame Street cupcakes all over again. Such pretty colors though! 


Look at how vibrant the red cake is! 


You have to cut each cake in two.  When I did this it seemed as if my cakes were not tall enough to cut, but I carefully did so without breaking them, thankfully. 


I followed the instructions in the recipe carefully to ensure I was layering hte right colors properly to make the flag. It started with red followed by a layer of buttercream. 


Red, white, red white to make the stripes. 


Then came blue. I should have cut the circle in the middle out less on an angle, but it still worked out ok. 


I filled in the blue circle with more red and white cake and it was ready to frost. 


It took me a whilte to frost with doing a good crumb coat layer, then I put it in the refrigerator for a while and did another layer.  I spun it around and put pressure down with the offset spatula to make a swirl on top. 


Then I did some fairly easy and simple decorations with red sprinkles and red hots.  After, the real reveal with this cake is on the inside!


When I cut into it and cut out a slice, the kids were amazed!


Not bad for my first attempt, but the blue layer was a little tilted with how I had cut the center out. 


Happy Birthday America!