Friday, November 12, 2010

Pumpkin Cupcakes


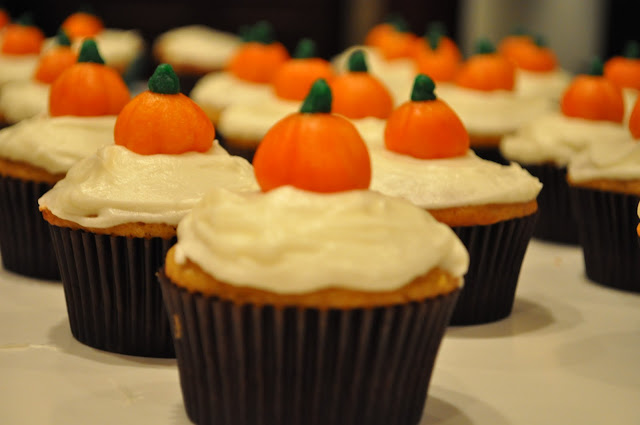
These pumpkin cupcakes were actually the other flavor that my friend wanted for her daughter's christening.  I've been wanting to do something this autumn with marzipan and thought the little pumpkins would be cute.  This is an idea I've seen a few places and is in the Martha Stewart Cupcakes book. I used that recipe for the pumpkin cupcakes, but did my marzipan pumpkins a little different, primarily as I don't have a leaf cutter that is that small.  I made cream cheese frosting to go with the pumpkin cupcake, but I made a triple recipe to be able to frost a few dozen cupcakes.  I have some leftover that I'll freeze to use later - maybe for red velvet cake for the holidays.

I reconstituted my marzipan with corn syrup after it thawed.  At first I thought I'd need to scratch it, but it ended up coming together after a lot of kneading.  I used Americolor Electric Orange and Leaf Green to color the marzipan for the pumpkin decorations.


They turned out nice and bright! I could've gone easier on the green. 

I don't have a tiny leaf cookie cutter, so I used this cutter and then snipped it into smaller pieces to use as the stem.

I rolled out the orange and cut it into pieces to have enough to put on all the cupcakes.

I rolled the orange pieces into little balls and set them aside on parchment paper so they wouldn't stick to the counter.


When I put them all together, I dipped the stem in a tiny bit of corn syrup to help it stick. Then I used a toothpick to put ridges on the sides of the pumpkins.


I love them - how cute!  I didn't take the time to carve a pumpkin this year, but I made my own!


A pumpkin patch of cupcakes...


Christening Cupcakes


A friend of mine asked me to make some cupcakes for her daughter's christening this weekend.  I was very honored, of course, and took the challenge on.  I really don't do a lot of baking for order and mainly just bake for fun, family gatherings or to try something new.  So, I have to admit I was a bit nervous to make sure I created something that was special enough and tasted amazing too.  We talked through flavors and decorations and while she thought chocolate would be good, she left it to me to come up with colors and decorations for her. 

I was thinking of doing some fondant or marzipan cut outs in white on a colored buttercream, but I had difficulty finding small fondant cutters in the shape that I was looking for - crosses and doves.  However, at my baking supply store, they do have candy making supplies and I found these great chocolate molds. While it was a little tedious, it was quite easy to do and I love how they turned out.  I melted down my white chocolate pieces in a glass measuring cup in the microwave, poured it into the molds, tapped them to get the bubbles out and let them set for around 10 minutes in the freezer.  Just like the lady at the store said, they popped right out after I took the trays out of the freezer. I made chocolates!


I tried a different chocolate cupcake recipe for these.  I used the Devil's Food Cupcake recipe from my Martha Stewart's Cupcakes book.  I LOVE this recipe compared to others I've tried.  The cake is much more dense and moist and has a nice rich flavor (yes, I had to sample one!).  I made a simple vanilla buttercream frosting with the white chocolate decorations. 


I was so happy I remembered to get a few cupcake bakery boxes to transport them in.  Plus, it makes them seem professional when they're packaged nicely. 

I really like the color of these.  They remind me of the Wedgewood jasperware pottery that I have a small collection of. I hope she likes them!

Friday, November 5, 2010

Meringue Nests with Blackberries and Cream


Aren't these blackberries gorgeous?  They were on sale at the market and while I used some of them in the apple-blackberry crisp I made last weekend, I still had some to use.  My mum came to visit again and I thought I'd try something special for dessert one evening.  We made crispy, airy, sweet meringue nests with these luscious blackberries and fresh whipped cream.  I guess this is sort of a version of a pavlova, but mini ones. I think pavlovas are typically one large meringue cake with cream and fruit. These are individual little nests made of meringue.  I guess I just like the idea of a nest anyway...it makes everything sound cozy.

The meringue is very easy to make.  I've made it before, but this was my first attempt at nests. I whipped the egg whites, sugar and some vanilla and got this thick glossy meringue.


I spooned these heaping mounds of meringue on the Silpat.  The original recipe called for eight nests and I didn't seem to have room, so I had five pretty large nests.


Then, I took the back of a spoon to hollow out the center (with still leaving a layer in the nest) and smoothed the edges a bit. 

Here they are ready to bake. I know many people pipe them onto the baking sheet, but I sort liked the homemade swirled look to mine.


After two hours of baking at just over 200 degrees, they were all ready and peeled right off the Silpat.  I washed the berries and let them dry so that they wouldn't make wet pools in the meringue nests when I put them together.


Our evening treat was ready with a bunch of berries nestled in the meringue and topped with a big dollop of whipped cream.  It's a very simple dessert that would be easy to prep ahead of time and use with all kinds of fruits.  The flavors were uncomplicated, yet fresh and sophisticated.


Recipe for Meringue Nests


Ingredients:
3 egg whites
175 g/6 oz caster (superfine) sugar
A few drops of vanilla essence (extract)

Lay a Silpat or piece of parchment on a baking (cookie) sheet. Whisk the egg whites until stiff. Add 1 tbsp of the sugar and the vanilla and whisk again until stiff and glossy. Gradually whisk in half the remaining sugar, then fold in the remainder with a metal spoon. Spoon five to eight round heaps of the mixture a little apart on the baking sheet and hollow out slightly in the centers to form nests. Rough up the mixture slightly round the tops. Bake in a preheated oven at 225°F for 2-3 hours or until crisp but still white. Remove from the oven and leave to cool. Carefully lift off the paper and store in an airtight container.

Wash the fruit to fill them in advance and dry in a bowl with paper towel.

For the whipped cream, use 1 cup of heavy whipping cream with a tablespoon of caster sugar and whip on high until thick and creamy.

Monday, November 1, 2010

Caramel Apple Cookie Pops


I've made this caramel apple cookie recipe before and just made the regular cookies. I took them to the neighborhood Halloween party last year and they got rave reviews.  While I knew it was an amazing recipe, I wanted to do something different this time around, especially since I was planning to take them to the same party again this year. Since they are inspired by caramel apples, I thought...why not add sticks to them like caramel apples?  Plus, it would make it fun for people to eat at the party. I haven't made cookie pops before, but I knew it was a nice thick cake-like batter that would probably work.  They are yummy too!  They're made with fresh shredded apple and with the caramel icing, they taste just like the real caramel apples.  Except they're better...and not as messy!

I made the dough, put scoops on the Silpat, placed the lollipop stick through the center and flattened each cookie scoop with the back of a spoon to get more of a round shape and set it into the stick.
I let them cool on a pan a little after baking and carefully transferred them with a spatula to some parchment paper to cool and set.

The caramel apple icing was carefully applied so as to not pull on the stick too much and voila!....caramel apple cookie pops! The original recipe called for adding nuts like the apples I have here, but I was taking them where there would be lots of kids so I thought I better not chance it with possible allergies. They were a hit again and gone before I left the party early!
My sister and her family came to the party with us and she made these yummy and adorable spice sandwich cookies with homemade jack-o-lantern faces.  We used some cream cheese frosting that we colored orange to put in between and also used some of the leftover caramel apple icing for some. 

She even made some pretty oak leaves.  The pumpkin faces were the best to see the icing through and it oozed out through the eyes when you took a bite! :)
  
Recipe for Caramel Apple Cookie Pops
 (Adapted from a recipe for Caramel Apple Cookies in Midwest Living Magazine) 

Ingredients:

Cookie dough:
  • 1/2 cup unsalted butter, softened
  • 1 1/2 cups packed brown sugar
  • 1 tsp. baking soda
  • 1 t. pumpkin or apple pie spice
  • 1/4 tsp. salt
  • 1 egg
  • 1/2 cup apple juice
  • 2 1/4 cups all-purpose flour
  • 1/4 cup whole wheat flour
  • 1 large tart apple (peeled, cored and coarsely shredded)
Icing:
  • 1/2 cup packed brown sugar
  • 3 Tbs. unsalted butter
  • 3 Tbs. apple juice
  • 2 2/3 cups powdered sugar
Chopped nuts (optional)

Directions:
In a large mixing bowl, beat 1/2 cup butter with an electric mixer on medium to high speed for 30 seconds.  Add 1 1/4 cups brown sugar, baking soda, pie spice, and salt. Beat until well-combined, scraping sides of bowl. Beat in egg until well-combined. Add 1/2 cup apple juice; beat on low speed until combined (don't worry if mixture looks a little curdled). Beat in the flours and fold in the shredded apple.

Drop dough by slightly rounded teaspoons 2 inches apart onto a greased or Silpat lined cookie sheet. Be careful not to make them too big if you're making cookie pops so they won't fall off the sticks if they're too heavy.  If you are doing pops, stagger the scoops on the cookie sheet and place the sticks into the center of the rounded teaspoon.  Run a spoon under warm water and flatten each of the cookie scoops slightly with the back of the spoon.  Bake at 350 degrees about 10-12 minutes or until tops and edges are browned.  Let stand for a few minutes to cool and transfer carefully to parchment paper or wire racks for icing.

For icing: In a small saucepan, heat and stir 1/2 cup brown sugar, butter and apple juice over medium heat until all the sugar dissolves. Remove from heat and whisk in the powdered sugar.  If it is too thick, you can add a touch more juice or if it's too runny add a little more powdered sugar.  If you let it sit too long, it will thicken and you may need to add some juice to get it back to spreading consistency.  Spread carefully on top of cookies and sprinkle with chopped nuts, if desired.

Sunday, October 31, 2010

Apple-Blackberry Crisp

This past summer, my mum and I stopped at an Amish farm stand and bought some gorgeous blackberries. We waited for quite some time for someone to come out and help us and this little girl was sitting on their porch quietly the entire time just looking at us and barely making a noise.  She couldn't have been more than a year old and I was surprised to find her out there on her own. She has the sweetest face and looked so cute in her little Amish outfit.  I almost thought she was a baby doll!


Their farm was immaculate and the wheat fields were bright gold and swaying in the wind making the most calm de-stressing sound. I could've taken a nap laying in that field after eating our blackberries!


 We brought the blackberries home and my mum was reminiscing about how her grandmother used to make apple blackberry pie. Well, we didn't make it then as it wasn't apple season.  But, it is now!  I have tons of honey crisp apples left from our last trip to the orchard...the ones that Audrey is munching on in this photo we recently had taken up at the family farm. I also found blackberries on sale at the local market and thought I'd make an apple-blackberry creation as my mum was coming over to visit. 


I didn't feel like making a traditional pie, so I went with a crisp. I cooked the apples slices first with butter, brown sugar, cinnamon and nutmeg to cook them down.  It's nice to just throw everything in together to bake, but if you do that with the blackberries, I suppose they would be complete mush.  The apples cooking on the stove top smelled amazing!  And, they looked so pretty when you tossed them in with the blackberries.

The blackberries cooked down and bubbled up making an amazing blackberry apple jam with soft chunks of fruit and a crispy oatmeal crust on top.  It was amazing served warm with vanilla bean ice cream in the company of my wonderful family. Mum really enjoyed it too!  I still have some of the blackberries left and may have to come up with another treat to make as mum is visiting me this week.


Recipe for Apple-Blackberry Crisp
(Adapted from Williams-Sonoma recipe for Apple-Blackberry Cobbler)

Ingredients:

Fruit mixture:
  • 2-3 lbs. peeled and cored apples cut into slices (I used honey crisp)
  • 1 cup firmly packed light brown sugar
  • 1/2 cup granulated sugar
  • 1 tsp. ground cinnamon
  • 1/2 tsp. salt
  • 1/4 tsp. freshly grated nutmeg
  • 3 Tbs. cornstarch
  • Zest of 1 lemon
  • 2 Tbs. fresh lemon juice
  • 2 pints blackberries
Crisp:
  • 1 cup rolled oats (regular or quick cooking)
  • 1 cup brown sugar
  • 1/2 cup flour
  • 1/2 tsp. cinnamon
  • 1/2 cup (1 stick) unsalted butter (room temperature)
Directions:
In a large stock pot, stir together the apples, brown sugar, granulated sugar, cinnamon, salt, nutmeg, cornstarch, lemon zest and lemon juice. Transfer to stove, cover and set over medium heat. Cook the apples, stirring occasionally, until almost tender. Fold in the blackberries and transfer to an oven safe baking dish.
Preheat an oven to 350°F.
For the crisp topping, combine the oats, brown sugar, flour and cinnamon in a medium bowl. Cut in the butter until it resembles coarse crumbs. Sprinkle crisp topping over fruit filling until covered completely.
Bake the cobbler, uncovered, until the topping is golden brown and crisp, about 35-45 minutes. Let cool for at least 15 minutes before serving.  Serve with vanilla ice cream!

Monday, October 25, 2010

Halloween Cupcakes

There were a few pre-Halloween occasions that called for a treat so I made a few different Halloween inspired cupcakes, but my favorites were these friendly ghosts.


For my daughter's Montessori Fall Festival cakewalk I did a simple vanilla cupcake with vanilla buttercream and a sprinkling of candy corns.  I even bought some special window top cupcake boxes this year so people at the cakewalk could easily view the treats inside. 


My friend hosted her annual Halloween party in her amazing barn and asked me to bring some cupcakes.  I made several fondant ghosts to top the remaining vanilla cupcakes.  It was too much work to make 20+ ghosts, so I colored the rest of the buttercream orange and decorated them with brown sprinkles and candy corn.


To make the fondant ghosts, I started out by cutting giant marshmallows in a cone shape and made sure it was a little rounded on top.  By cutting the marshmallow, I was able to get it the shape I wanted and it also made the marshmallow nice and sticky for the fondant to adhere.  I referenced my marzipan book and it had a guide for ghosts using a cone shaped and round piece of marzipan under the circle, but you needed to hold them together with a toothpick and I didn't want to have a sharp toothpick in the cupcakes that little kids would be eating.  So, I tried out the marshmallow idea. What kid doesn't like marshmallows!?


Next I rolled out my white chocolate fondant and cut out large circles that were draped on top of the marshmallow and then crimped a little at the bottom.

When I was in England recently, I bought a package of caramel and chocolate decorating tubes and used the milk chocolate one to make the eyes and mouth.  This was much better to use than the gel decorating tubes as they are quite gooey.  The chocolate was easy to put on and hardened nicely.  Plus, the chocolate color matched the dark brown cupcake papers I baked them in.


Our neighborhood has our Halloween party this coming weekend and my family is visiting, so I'm sure I'll be inspired to create some other fun fall goodies.

Friday, October 15, 2010

Charming England, Memories of Nan, Afternoon Tea and Custard Galore


It was a bittersweet trip to England this past week, but mostly sweet.  We enjoyed lots of time with family, shared memories of Nan and celebrated her life.  I enjoyed this cup of tea with my Aunt who reminded me these were my Nan's favorite cookies.  I had actually made her some of the traditional palmiers for her last birthday. We had a nice visit with Auntie Vera and she gave us her version of the recipe for "Granny's Christmas Cake" and told us the whole history of when they originally started making it back in India. We'll see how it turns out for Christmas this year!

We had another stop at a nice cafe with my Aunt and Uncle to enjoy some treats and coffee (and an espresso sized milk for Audrey).


Dinner one evening brought us to the Giant's Rest, my favorite pub, where I used to study by the fire with a glass of red wine the winter I went to school there. I was anxious to review their chalkboard of puddings available for the day. 


We chose the butterscotch and apple crisp to share.  It comes covered in custard and we actually asked them to hold back a little on the custard, so they just doused half the dessert with it.  Audrey enjoyed an entire bowl of mandarin organge sorbet.


My cousin and godmother, Ann, always makes nice desserts.  They made a chocolate sponge cake the evening we were there for dinner.  And, again there was more custard.  This was such a yummy warm dessert! 


The day before we left we were able to make it to Alfriston for afternoon tea.  It's our favorite spot and where we often came with Nan.  In fact, we were seated at the same table we always sat with her and I sat in the same chair that I remember her being in when she last went there with us.  We shared a ploughman's lunch and had cream tea with scones.  The clotted cream is amazing!


The Singing Kettle is just a little tea room, but so quaint.


Here are a few sights as we walked around Alfriston that afternoon.  This was such a neat old watering can and the flower arrangements everywhere are gorgeous.


I love the custom painted house numbers.


The shops are full of amazing things and the general store counter is filled with fun pastries, candies, teas and jams.


The streets are miniscule in this town and there are beautiful views of the downs.


You don't see these too much anymore!


There are many days that I think about the quiet and sweet little town of Alfriston.  Why couldn't I just live in this beautiful Rose Cottage and walk up the road to run one of the tea rooms?