Showing posts with label cupcakes. Show all posts

Tuesday, October 31, 2017

Halloween Spiderweb Cupcakes


We were having a few friends over for Halloween night to have dinner prior to going out trick or treating so I wanted to make a fun dessert.  It's not that you need MORE sweets on Halloween, but I have been wanting to try piping chocolate decorations and thought I'd give this a try for the occasion. 

I made a different chocolate cupcake recipe that I found by Ina Garten as I wanted to do a glossy ganache on top. It was definitely a different cake recipe that called for no leavening or cocoa but Hershey's chocolate syrup instead? I was skeptical but gave it a try. They baked nicely and they were definitely more dense, but it was perfect to hold the ganache frosting and it didn't soak through after we dipped the tops in the glossy chocolate and heavy cream mixture. 


It was SO fun piping the white chocolate! I melted down Ghiradelli chocolate disks and put it in a quart size bag with the corner snipped off to make a piping bag. It worked well, but you need to work quickly before the white chocolate starts to solidify in the bag. 

I used a template for the spiderwebs that I found online and piped along the lines on wax paper.  I placed the cobwebs in the freezer to harden and continued with piping. I bought a bag of plastic spiders and decorated each one with a spider. 


I even had a little extra white chocolate so I tried my hand at piping a short "Boo!" on a few. 


They were a hit for dinner and enjoyed after a long walk around Georgetown for trick or treating. Happy Halloween! 


Sunday, March 5, 2017

Chocolate Cream Cheese Cupcakes


My mum has made these yummy cupcakes since I was little. It was always a favorite at school birthday celebrations or as a treat at home. 

I'm not the biggest fan of chocolate cake, but these...these cupcakes with the airy chocolate cake and the big glop of cream cheese in the center.  These are amazing. 


I made the chocolate cake batter first and put it in the cupcake papers, then mixed up the cream cheese filling to drop into each cupcake.  These are the ultimate creamy filled cupcakes without having to inject the filling. 


I dropped a heaping tablespoon of the cream cheese-chocolate chip mixture in each one and they are ready to bake.  


Here they are prefectly baked and ready to enjoy. 


The beautiful thing about putting chocolate chips into the cream cheese is that you end up with melted chcolate inside cream cheese INSIDE chocolate cake!  They are especially amazing when they're warm with a nice cold cup of milk. 

Ingredients:

Chocolate cake:
1 C. sugar
1 1/2 C. flour
1/4 C. cocoa
1 t. salt
1t. baking soda
1/2 c. oil
1 T. vinegar (white or apple cider)
1 t. vanilla


Cream cheese filling:
One 8 ox. package of cream cheese
1 egg, slightly beaten
1/3 C. sugar
1 pinch salt
6 oz. chocolate chips


Directions:

Cake: Mix all ingredients well and fill cupcake papers 1/3 to 1/2 full with the cake mixture.

Filling: In a small bowl, combine the cream cheese, egg, sugar and salt. Add the chocolate chips and mix together. 

Drop a large spoonful of the cream cheese-chocolate chip mixture on top of each cupcake in the raw batter.

Bake at 350 degrees for 20-25 minutes or until firm. 


Sunday, September 28, 2014

Birthday Cupcakes


Miss A turned 6. S-I-X. I cannot believe it. She happened to have soccer practice the day of her birthday, so I thought that was the perfect opportunity to celebrate her birthday. We had a fun soccer themed party and these fun cupcakes we made with turf or grass and soccer ball rings. 


Earlier in the day, I took these mini cupcakes with pink cherry frosting and fondant flowers for a class birthday celebration.


We had SO many cupcakes.  In fact, it was enough to feed the soccer team two times over.


We had such a fun soccer birthday party picnic after practice. 


But driving home with the bouquet of a dozen balloons in the convertible was the most fun. 


Sunday, April 3, 2011

Cherry Blossom Cupcakes


I hadn't made any fun cupcakes in a while and was inspired by the cherry blossoms here in DC. It was wonderful and they were just as gorgeous as everyone says they are. So, here is my fun springtime take on a cherry blossom cupcake. 


I was going to make a cherry almond cake, but didn't want flavor overkill, so I just went with a vanilla cake. I had all kinds of fun flower and cherry papers that I had gotten in England last year so it was fun to have something to use those for.


I also decided to make two different sizes...little mini ones and standard size cupcakes. 


The frosting?  Real buttercream, of course and I made my usual vanilla buttercream with a cherry twist.  I used a few tablespoons of diced maraschino cherries and just one drop of Americolor soft pink gel food coloring. 


The maraschino cherries I found at Whole Foods are SO good.  They are organic ones that have no added color. It was nice to find some that aren't bright neon red and taste like they've been soaking in syrup. These actually seemed like fresh cherries with the stems still on and were already pitted (they were also $7 a jar).


I love how the frosting has little specks of red cherry in it.


I used already prepared marzipan (I know, slacker right?) for the little flowers on top. I have always made my own marzipan, but tried this one that I found at the store and it tastes amazing (and is much easier, of course).  I colored it pink with the same soft pink food coloring and used little candy pearls to press into the center of each marzipan flower.  My little marzipan cherry blossoms!

My little A tested a mini one for her snack this evening and loved it.  The rest are already packed to take to my fellow Washingtonians to enjoy at the office tomorrow.


Friday, November 12, 2010

Pumpkin Cupcakes


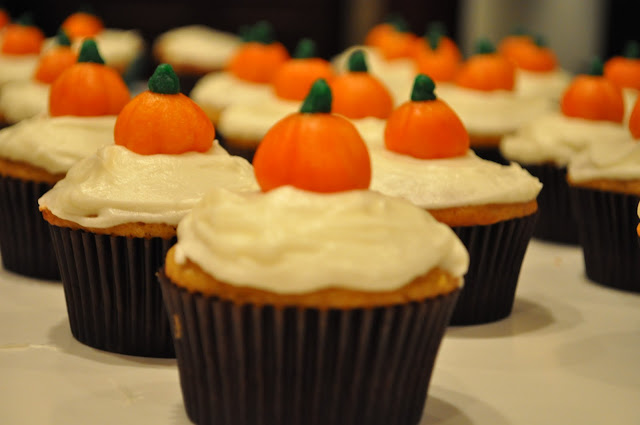
These pumpkin cupcakes were actually the other flavor that my friend wanted for her daughter's christening.  I've been wanting to do something this autumn with marzipan and thought the little pumpkins would be cute.  This is an idea I've seen a few places and is in the Martha Stewart Cupcakes book. I used that recipe for the pumpkin cupcakes, but did my marzipan pumpkins a little different, primarily as I don't have a leaf cutter that is that small.  I made cream cheese frosting to go with the pumpkin cupcake, but I made a triple recipe to be able to frost a few dozen cupcakes.  I have some leftover that I'll freeze to use later - maybe for red velvet cake for the holidays.

I reconstituted my marzipan with corn syrup after it thawed.  At first I thought I'd need to scratch it, but it ended up coming together after a lot of kneading.  I used Americolor Electric Orange and Leaf Green to color the marzipan for the pumpkin decorations.


They turned out nice and bright! I could've gone easier on the green. 

I don't have a tiny leaf cookie cutter, so I used this cutter and then snipped it into smaller pieces to use as the stem.

I rolled out the orange and cut it into pieces to have enough to put on all the cupcakes.

I rolled the orange pieces into little balls and set them aside on parchment paper so they wouldn't stick to the counter.


When I put them all together, I dipped the stem in a tiny bit of corn syrup to help it stick. Then I used a toothpick to put ridges on the sides of the pumpkins.


I love them - how cute!  I didn't take the time to carve a pumpkin this year, but I made my own!


A pumpkin patch of cupcakes...


Monday, October 25, 2010

Halloween Cupcakes

There were a few pre-Halloween occasions that called for a treat so I made a few different Halloween inspired cupcakes, but my favorites were these friendly ghosts.


For my daughter's Montessori Fall Festival cakewalk I did a simple vanilla cupcake with vanilla buttercream and a sprinkling of candy corns.  I even bought some special window top cupcake boxes this year so people at the cakewalk could easily view the treats inside. 


My friend hosted her annual Halloween party in her amazing barn and asked me to bring some cupcakes.  I made several fondant ghosts to top the remaining vanilla cupcakes.  It was too much work to make 20+ ghosts, so I colored the rest of the buttercream orange and decorated them with brown sprinkles and candy corn.


To make the fondant ghosts, I started out by cutting giant marshmallows in a cone shape and made sure it was a little rounded on top.  By cutting the marshmallow, I was able to get it the shape I wanted and it also made the marshmallow nice and sticky for the fondant to adhere.  I referenced my marzipan book and it had a guide for ghosts using a cone shaped and round piece of marzipan under the circle, but you needed to hold them together with a toothpick and I didn't want to have a sharp toothpick in the cupcakes that little kids would be eating.  So, I tried out the marshmallow idea. What kid doesn't like marshmallows!?


Next I rolled out my white chocolate fondant and cut out large circles that were draped on top of the marshmallow and then crimped a little at the bottom.

When I was in England recently, I bought a package of caramel and chocolate decorating tubes and used the milk chocolate one to make the eyes and mouth.  This was much better to use than the gel decorating tubes as they are quite gooey.  The chocolate was easy to put on and hardened nicely.  Plus, the chocolate color matched the dark brown cupcake papers I baked them in.


Our neighborhood has our Halloween party this coming weekend and my family is visiting, so I'm sure I'll be inspired to create some other fun fall goodies.

Monday, September 27, 2010

Sesame Street Cupcakes


I've expanded upon the cupcake birthday party for my daughter's first birthday and focused on a particular theme.  She isn't really into many Disney or other characters, but definitely knows who Elmo and Cookie Monster are.  So, we had a Sesame Street birthday party complete with Elmo, Big Bird, Oscar the Grouch and Cookie Monster (see below) as the sweet treats.

I ordered special cupcake papers for each one. I had the solid colors for all of them, but used the fun Elmo ones for him.


After a huge batch of buttercream and a few bottles of food coloring, I used the star tip to pipe each color on to make it look like "fur." This was the easy part...


I used white chocolate fondant and colored it black for the mouth, used white circles for the eyes, orange for Elmo's nose and yellow for Big Bird's beak.  This was the difficult part....now it was time for the assembly of a few dozen happy monsters.

They were almost fully assembled the evening prior and brought out for the finishing touches (eyes and oscars red tongue) on the day of the birthday about an hour before it started.  Here are all the monsters on display before they were gobbled up.

Big Bird's beak was a little tough to get just right.


Cookie Monster was my favorite.


Oscar's eyebrows were a little hard to get just right, but he's a little messy anyway, right?

Elmo has a huge nose! Those that liked the fondant definitely chose him!


All displayed and ready for the taking.


Can you tell which one the birthday girl picked out?  Yep...that would be Elmo!