Showing posts with label fondant. Show all posts

Saturday, February 16, 2019

Heart Cookies with Marbled Fondant


I went to an event where I got a bunch of fondant samples to bring home. I typically make my own white chocolate and marshmallow fondant, but wanted to try something fun and different with this prepared fondant that I had to use.  I had seen these fun marbled heart cookies on the cover of Family Circle, of all places. They looked impressive and seemed fairly easy so I thought I would give it a try. 

I used their recipe for the vanilla sugar cookies and while the consistency of the dough was very crumbly, they came together and the cookies turned out quite nice. 

All of the fondant that I had was white, so I got out my gel food coloring to make some black and pink as I was really wanting light pink and grey marbled cookies. I wish I had a lighter pink, but this was all I had. 


As I look back on the image from the magazine, I mixed in more color than white, but I still like the marbled look I got for my first try at this. 


I cut out some small and some large hearts. I even did a few with a scalloped cutter (see last photo) that my daughter really wanted to try. I made a simple vanilla buttercream to be the glue for the fondant heart and then used the same cookie cutter to cut out the fondant to top them off.  I'm not that great at piping royal icing on cookies (at least not yet), but I found this to be a great way to get a really polished look for decorated cookies. 

I loved my pretty heart cookies and packaged them for Valentine gifts for teachers and friends. They are especially good with a cup of creamy hot tea. Eat your heart out! :) 


Sunday, January 14, 2018

Unicorn Cake


I started planning to make a nice red velvet cake for a birthday girl and it turned into THIS.  Well, she really loves horses and unicorns too, so I thought I would try to make it a little fancier than just a typical layer cake.  We have all seen all kinds of these unicorn cakes and they are sprinkled all over Instagram if you follow some of the bakers out there. I was not too sure how this would turn out, but was quite pleased for my first try as an amateur.

I was not sure where to start, so I researched different cakes on Instagram and online and came across this YouTube tutorial that was both entertaining and helpful. In the tutorial they made a funfetti cake, but I stuck with red velvet and followed other recipes for my cake, buttercream and made my typical marshmallow white chocolate fondant.


I made three layers of red velvet cake and a simple vanilla buttercream to put in between and then spread on top and the sides to get the fondant to stick. 


I made the white chocolate marshmallow fondant and cut out the ears, horn and used the rest to cover.  For the horn, I wrapped a piece of fondant around a plastic chopstick to hold it in place and affix to the top of the cake. 


After the cake was wrapped in fondant, it was time for the fun part - the flowers to shape the unicorn's mane. I also used little sugar pearls to put on the center of the flowers and the detail around the base of the cake. 


She looks like she's closing her eyes to avoid the sparks.  What a fun birthday cake! 


Saturday, September 30, 2017

Donut Birthday Cake


For Miss A's birthday, we decided on a donut theme. This theme all started with a sprinkled donut pinata that she found and begged to get for her party.  I went crazy from there - donut decorations, donut party favors and since it was a sleepover party, donuts for breakfast in the morning!

The cake was more work that it looks and than I thought, but it was so fun to make and the girls loved it.

She decided on funfetti cake for her donut which is quite fitting. I have to admit that I've never made funfetti cake from scratch. The few times I've made it, I would buy a box cake (the horror!?). But I refused to do that and now realize that all you need to do is dump a load of sprinkles in the batter and voila!...funfetti! I used the funfetti cake recipe from The Cake Blog and it worked really well. 


I bought a special donut shaped cake pan on Amazon so we could have the perfect giant donut cake. I filled each side with batter almost to the brim. 


Here it is after I took let it cool and took it out of the pan. The baked quite well and I just evened out the flat side by cutting it with a bread knife so the donut would fit together nicely. After I evened out the flat side, I scooped out a trough in the center of each side with a spoon to pipe in the filling.


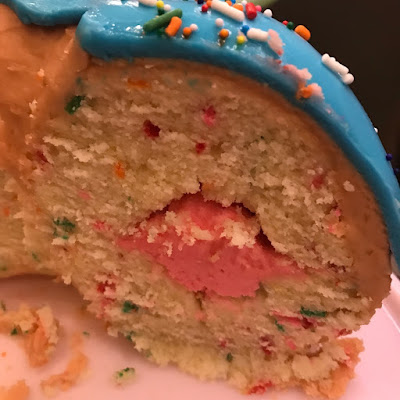
I made a pink buttercream for the filling and a neutral buttercream for the outside of the donut. 


I forgot to snap a photo of the trough with the filling, but here it is all put together when you cut through it. The trough allowed room for the filling and I used a piping bag with a large round tip to fill it in with the pink frosting.


One I put both sides together (and hoped it would hold!), I set out to frost the outside of the donut. I did one crumb coat and a second coat to make sure it was covered.


After I put the cake in the refrigerator for 10-15 minutes, I smoothed out the buttercream with a warm knife (by periodically dipping it in hot water) to get the frosting nice and smooth like this. 


I made my homemade white chocolate marshmallow fondant and then kneaded in this bright blue color (Miss A's favorite color). I rolled it out nice and smooth to cut the "glaze" for the donut. I used the donut pan to make a template on parchment paper to guide me and then used a paring knife to cut it a little jagged to look like the glaze was dripping down the donut. 


I made a mixture of equal parts vodka (strange, right?) and corn syrup to brush on top of the fondant glaze so it looked glossy and immediately sprinkled the sprinkles all over it and it also helped them to stick on the glaze.


I got this cute sign from Etsy and the donut cake is complete (6 hours later). But, SO worth it when Miss A saw the finished product and her girlfriends came over all excited for the giant donut cake. 


We're decorated and ready for the party! 


"Happy birthday to you!"


SO yummy and fun slices of the donut. 


After a fun sleepover (and some sleep) we had glaze your own donuts for breakfast too.


Sunday, May 7, 2017

First Communion Three Tier Cake


My little girl's First Eucharist was approaching and we were planning a small celebration at home. I emphasize "small."  We discussed what kind of cake she may want and she talked about three layers.  I thought "no problem!" I usually do a two layer cake, but three layers wouldn't be a big deal.  Until I realized that she actually meant three TIERS.

Ok, so this was another challenge on its own. Was it necessary or needed for what we were planning? Of course not.  But, I wanted to meet the challenge and I also wanted a happy little girl to be proud of her cake at her celebration after all the time and hard work leading up to her First Eucharist. 

We sat down one night to plan it out and here is the drawing we decided on. We talked about doing a few different types of cake and buttercream and landed on it being strawberry and vanilla flavors with buttercream and covered in fondant with crosses on the sides. 


I started working on it a few days in advance with baking the different cakes and wrapping them to keep until we assembled everything. 

Here is lovies helping with frosting as we put the layers together. The turntable for frosting that I got several years back really came in handy for this! The strawberry was so much more moist from the fruit so it proved more difficult with the fondant, but we made it work!


The topper of the little girl kneeling is the same exact topper that was on top of my First Communion cake in the 1980s.


She was SO excited about it and loved her cake. 


I want to work on getting the fondant even more smooth for each layer, but it wasn't too bad. 

The fondant recipe I used is my favorite thus far.  Previously, I've made a white chocolate fondant.  This was a white chocolate and marshmallow fondant with making it completely from scratch and without using the marshmallow fluff. 

White Chocolate Marshmallow Fondant

Ingredients:
3 C. mini marshmallows
1/2 oz. white chocolate, finely chopped
1 T. butter, cut into pieces
1 1/2 t. cream or milk
1 t. clear vanilla
3 C. powdered sugar

Directions:

Place marshmallows, white chocolate, butter and milk into a microwave safe bowl. Heat for one minute and stir until melted and smooth.

Stir in vanilla and add in half of the powdered sugar. Stir as much as you can and scrape down the edges. The mixture will be very sticky.

Lay down a large plastic mat covered with Crisco and sprinkle it with powdered sugar. Place the marshmallow mixture onto the surface and knead it continuing to add more powdered sugar. Knead until it's no longer sticky and it won't take anymore sugar.

Wrap the fondant in a flat disk in plastic wrap and put it in the refrigerator until you need to use it.

If you want to color it, take a small amount and add a few drops to a small piece that you can then knead into a larger piece until a consistent color of your liking is developed. 


Complete and on display, ready for cutting and serving with homemade vanilla ice cream. 


Sunday, September 28, 2014

Birthday Cupcakes


Miss A turned 6. S-I-X. I cannot believe it. She happened to have soccer practice the day of her birthday, so I thought that was the perfect opportunity to celebrate her birthday. We had a fun soccer themed party and these fun cupcakes we made with turf or grass and soccer ball rings. 


Earlier in the day, I took these mini cupcakes with pink cherry frosting and fondant flowers for a class birthday celebration.


We had SO many cupcakes.  In fact, it was enough to feed the soccer team two times over.


We had such a fun soccer birthday party picnic after practice. 


But driving home with the bouquet of a dozen balloons in the convertible was the most fun. 


Wednesday, September 29, 2010

Cake Decorating Class


I've frosted a lot of cakes in my lifetime, but I've decorated very few (aside from a dash of sprinkles).  I recently took a cake decorating class where I learned a lot of good techniques, how to use certain tips and got a little practice.  I'm still no pro, but I definitely feel more comfortable with a piping bag. 

For the class, we needed to bake, fill and crumb coat a layer cake. I decided not to use springform pans, but buttered and dusted these cake pans and they came out just fine. 


I made the vanilla butter cake recipe from my James Peterson "Baking" cookbook, filled my pans and leveled them an offset spatula. The cake was frosted with buttercream (really butter-cream) and filled with lemon curd.


We decorated in class and I didn't take any photos of the process.  I like how my pretty feminine cake turned out, but I actually didn't do a lot of fancy piping work.  This was officially the last of my pink and green white chocolate fondant that I had put in my bag to take to class and decided to use it.  I piped some pretty little leaves as the border on the bottom - I love the leaf tip!  Then, I used a flower and a leaf cutter to make the fondant shapes that I arranged on the top and sides of the cake. 


This would make a very nice little girls' birthday cake!


Instead of eating this whole thing with my little girl, I spread some sunshine with the teachers at her Monstessori and donated it to their teacher lounge for a special treat.