Showing posts with label meringue. Show all posts

Sunday, January 27, 2019

A Year of Baking


It's been a hectic year full of fun, travel, work, play and yet still lots of baking in between. I just haven't taken the extra time to catalog much of it here. I have enjoyed trying all kinds of fun recipes - usually to make something sweet for dessert when we have friends over and sometimes just to try something new.

This past year, I tackled making croissant dough again, piping beautiful pillowy meringue on tarts, decorating holiday cookies with royal icing and a few things in between. Nothing was perfect, but all of it was fun. It was a way to exercise some creative energy, focus on doing something that made me happy and feel good about sharing something with others to enjoy. I often have wondered why I spend hours pouring myself into baking projects in my very little down time, but my sister recently shared this Huff Post article with me where psychologists explain the benefits of baking for other people. It's so true and after what I've been through in life and to help focus on something beyond the daily stresses of work life, baking has been it for me.

I made a few banoffee pies, including this one with the buttery Digestive biscuit crust and chocolate flakes sprinkled on top. 


I love baking with berries and made this blackberry clafouti for dessert one evening. 


We always have this homemade pecan, coconut and dried cherry granola in the house - whether it's to snack on or top our yogurt for breakfast. 


I've always loved lava cakes and tried a new recipe a few times for these molten chocolate cakes. 


In the summer when we were not up for a heavy chocolate dessert, we made homemade ice cream topped with lemon curd, blackberries and homemade candied pistachios. 


In the autumn after we picked apples, I made this tarte aux pommes for a dinner party. 


With my mum from England, I like trying different kinds of scones, so I made these two kinds of fruit scones and several batches of cinnamon chip scones (not pictured). 


 I love making cakes of all kinds for people's birthdays (and even my dog's birthday) I made a few more cakes after the unicorn this past year.  

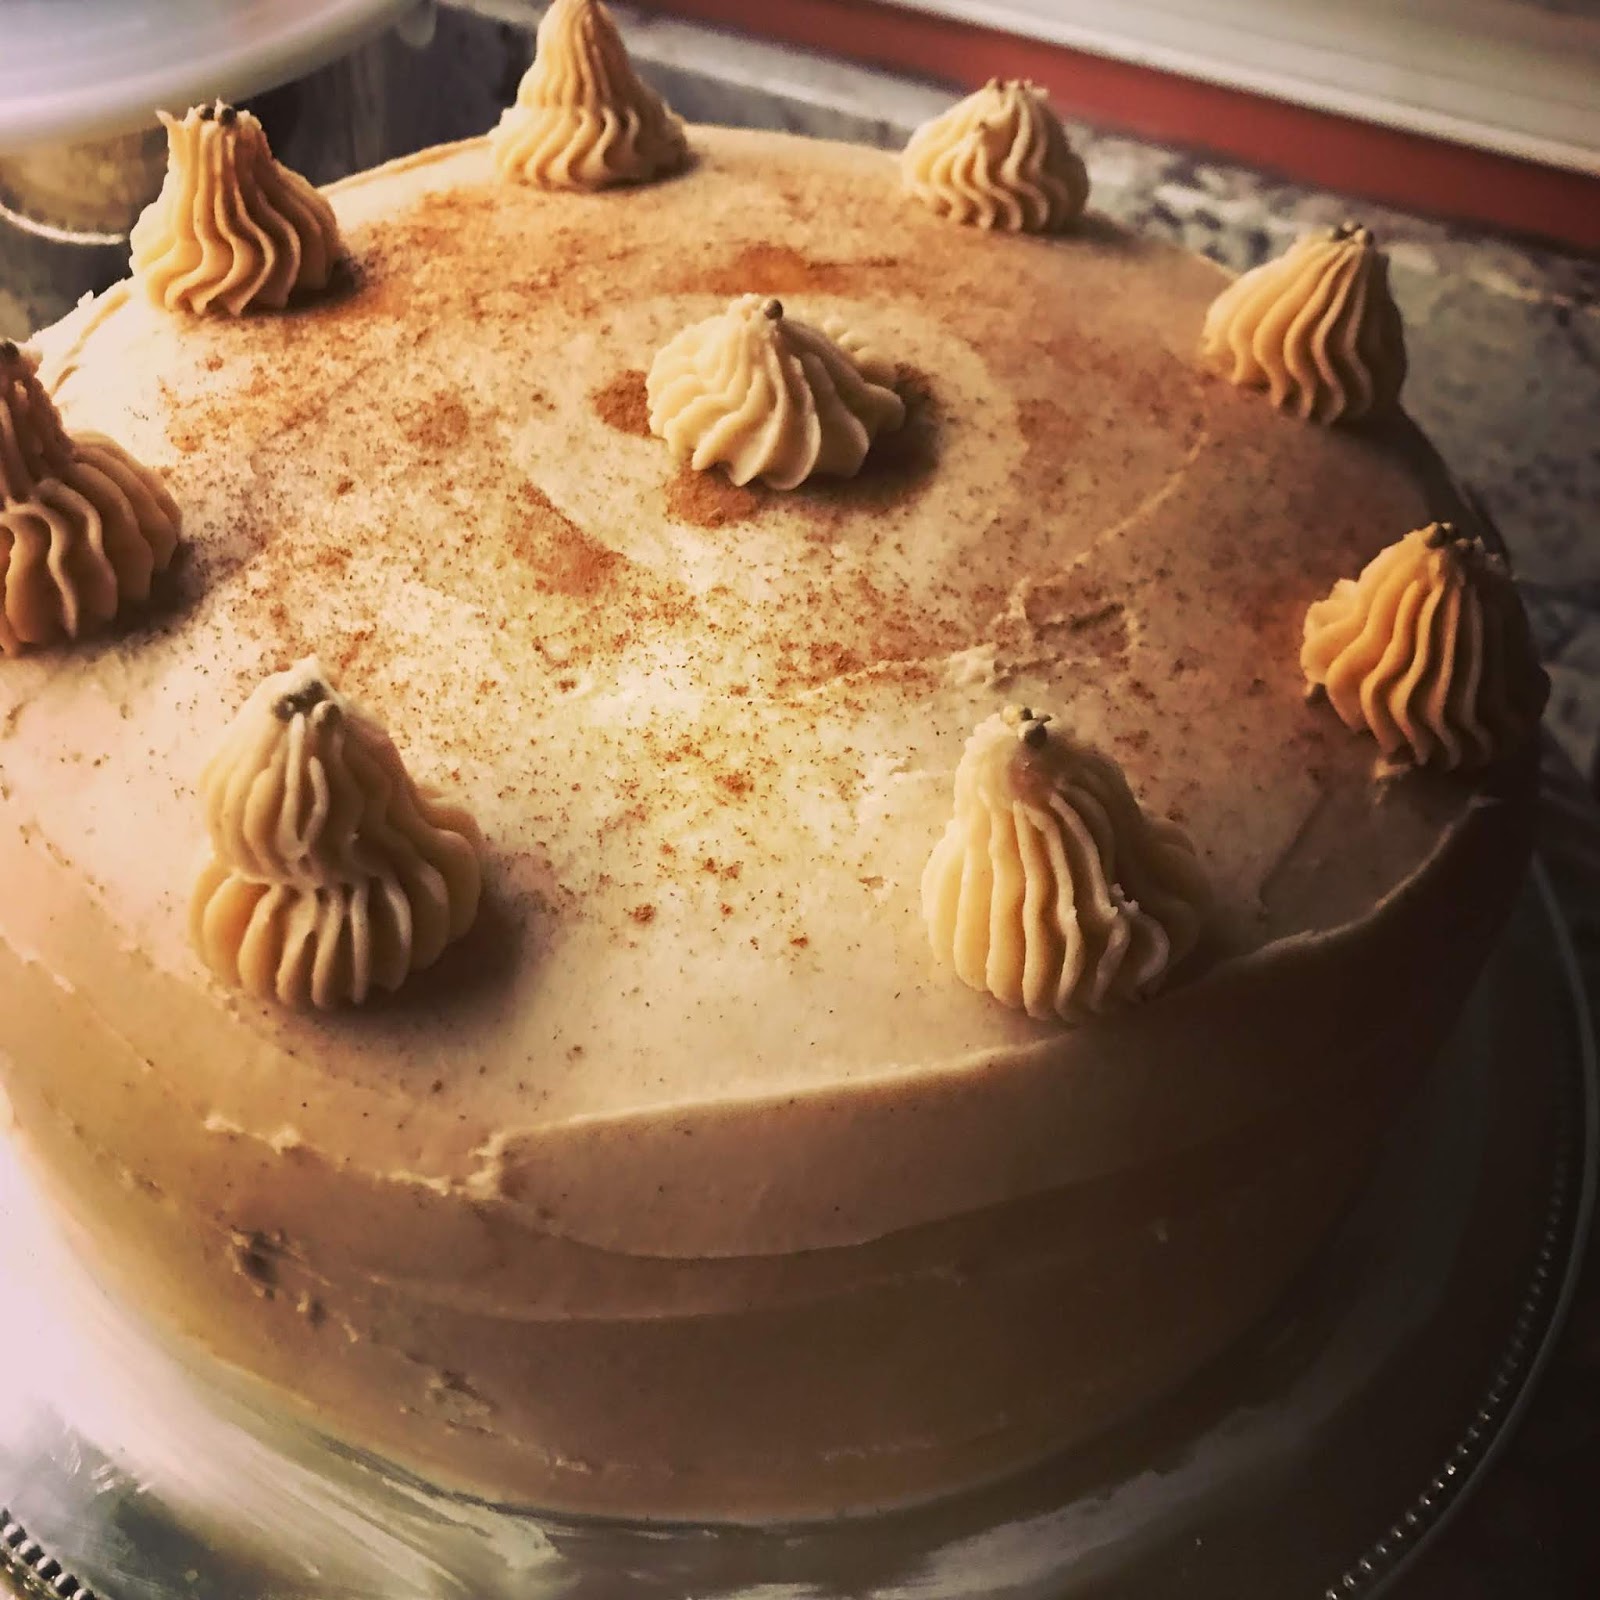
This was a pumpkin cake with cinnamon buttercream frosting. 


Our dog, Tootsie, turned 13 and reaching that age deserved a two tier cake!


I love sticky toffee pudding and cake and made this amazing sticky toffee cake with caramel sauce and sea salt. 


I have made my own croissant dough before, but this time I tried making pain au chocolat.  Not perfect, but all my work and they sure still tasted good. 


We had extra lemon curd so I made some lemon curd tarts with meringue piped on top. I have made meringue before, but experimented with getting it the right consistency and piping it in different patterns on the tarts.


 We had our annual homemade cinnamon rolls at Thanksgiving and Christmas this year - all cozy by the fire. 


 I also did lots of fireside cookie decorating at the holidays including these snowflakes, ginger people and ornaments with royal icing.  


I had some white chocolate to use and tried these white chocolate blondies with raspberries and cream. 


I took an amazing puff pastry class and made this puff pastry pear tart with caramel sauce. We also made cheese straws and I used the puff pastry I brought home to make chicken pot pie topped with puff pastry. 


There's a lot more baking in store for 2019. I look forward to learning lots more and trying new projects. 
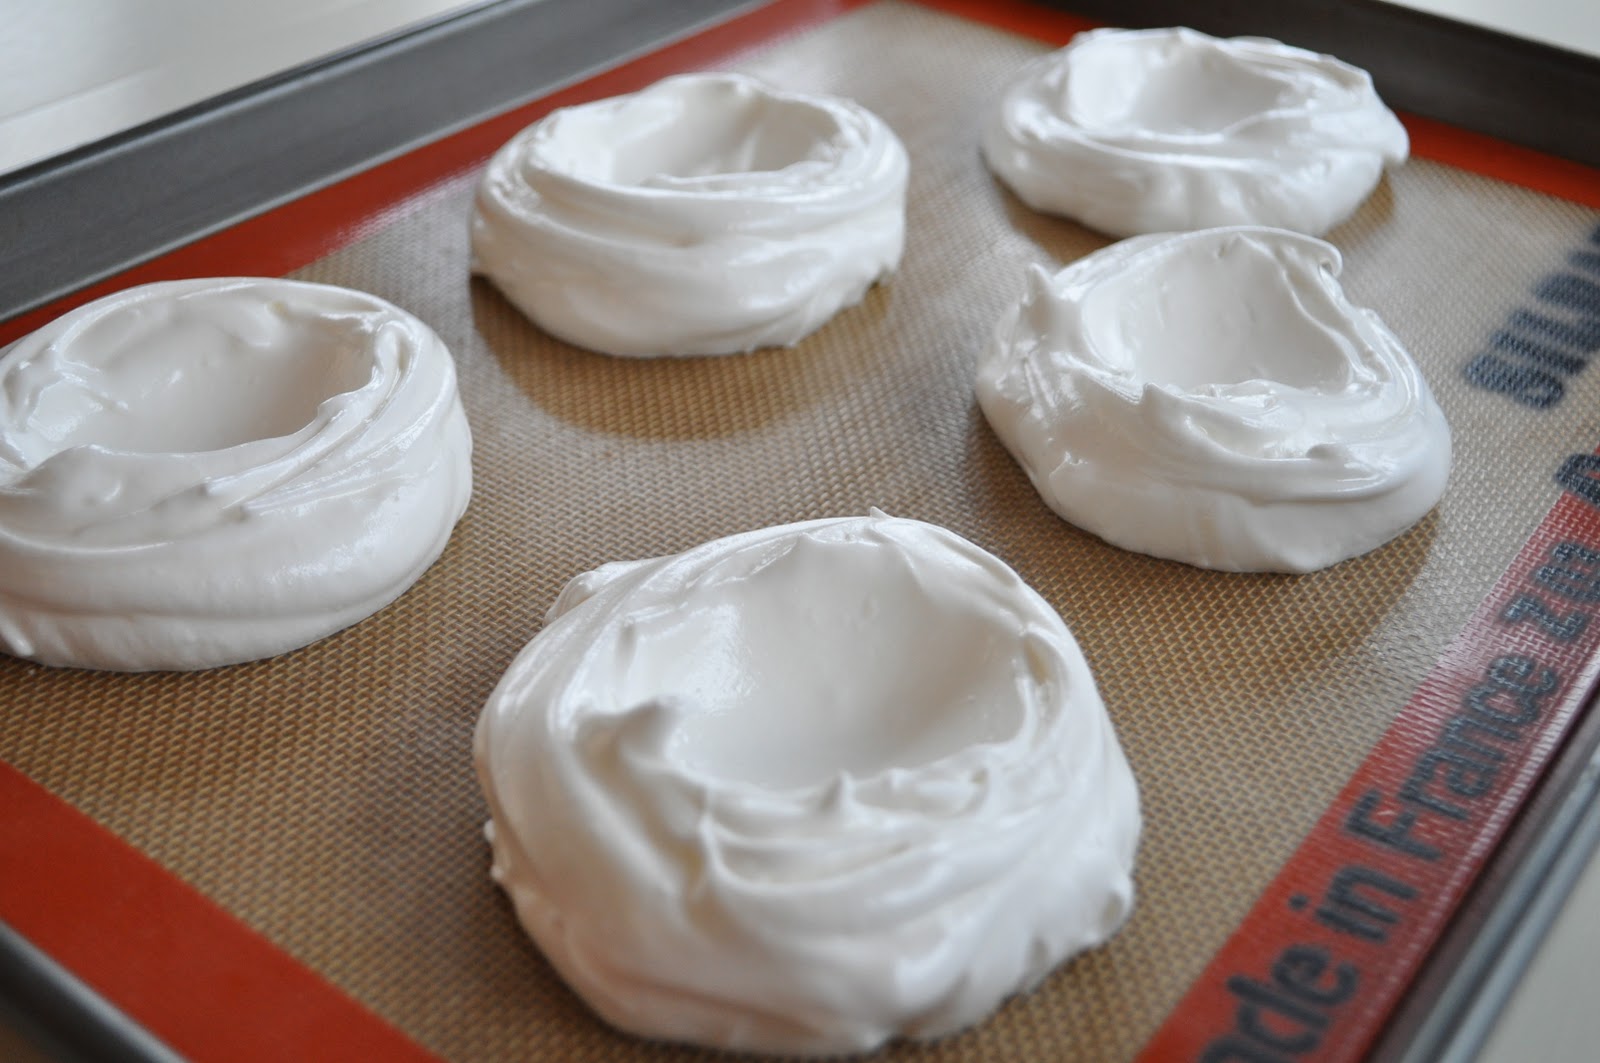
Friday, November 5, 2010

Meringue Nests with Blackberries and Cream


Aren't these blackberries gorgeous?  They were on sale at the market and while I used some of them in the apple-blackberry crisp I made last weekend, I still had some to use.  My mum came to visit again and I thought I'd try something special for dessert one evening.  We made crispy, airy, sweet meringue nests with these luscious blackberries and fresh whipped cream.  I guess this is sort of a version of a pavlova, but mini ones. I think pavlovas are typically one large meringue cake with cream and fruit. These are individual little nests made of meringue.  I guess I just like the idea of a nest anyway...it makes everything sound cozy.

The meringue is very easy to make.  I've made it before, but this was my first attempt at nests. I whipped the egg whites, sugar and some vanilla and got this thick glossy meringue.


I spooned these heaping mounds of meringue on the Silpat.  The original recipe called for eight nests and I didn't seem to have room, so I had five pretty large nests.


Then, I took the back of a spoon to hollow out the center (with still leaving a layer in the nest) and smoothed the edges a bit. 

Here they are ready to bake. I know many people pipe them onto the baking sheet, but I sort liked the homemade swirled look to mine.


After two hours of baking at just over 200 degrees, they were all ready and peeled right off the Silpat.  I washed the berries and let them dry so that they wouldn't make wet pools in the meringue nests when I put them together.


Our evening treat was ready with a bunch of berries nestled in the meringue and topped with a big dollop of whipped cream.  It's a very simple dessert that would be easy to prep ahead of time and use with all kinds of fruits.  The flavors were uncomplicated, yet fresh and sophisticated.


Recipe for Meringue Nests


Ingredients:
3 egg whites
175 g/6 oz caster (superfine) sugar
A few drops of vanilla essence (extract)

Lay a Silpat or piece of parchment on a baking (cookie) sheet. Whisk the egg whites until stiff. Add 1 tbsp of the sugar and the vanilla and whisk again until stiff and glossy. Gradually whisk in half the remaining sugar, then fold in the remainder with a metal spoon. Spoon five to eight round heaps of the mixture a little apart on the baking sheet and hollow out slightly in the centers to form nests. Rough up the mixture slightly round the tops. Bake in a preheated oven at 225°F for 2-3 hours or until crisp but still white. Remove from the oven and leave to cool. Carefully lift off the paper and store in an airtight container.

Wash the fruit to fill them in advance and dry in a bowl with paper towel.

For the whipped cream, use 1 cup of heavy whipping cream with a tablespoon of caster sugar and whip on high until thick and creamy.

Wednesday, April 21, 2010

Birthday Souffle


When I recently visited a friend for her birthday, I wanted to make her a special treat. I simply asked her what her favorite flavor is. She mentioned caramel and I recalled a recent Martha Stewart show where they made caramel souffle that looked amazing. So, we went to pick up the ingredients and one kids nap time and part of an evening later, we had gorgeous and perfectly risen caramel souffle's to celebrate her birthday.

The first step was to coat the souffle dishes with butter and turbinado sugar. We used the raw Maui sugar that you can get at any grocery store. It's so pretty and we hadn't even put the souffle in the dishes yet!

For the souffle batter you had to first make the actual caramel. I have not done this before and I was a little scared to cook sugar with nothing else in a hot pan, but it indeed cooked down and I just folded it in after it started to brown until it was all dissolved.
After the sugar was completely dissolved and caramelized, we added heavy cream and whole milk and ended up with this creamy caramel sauce. It smelled SO good!
Then, you mixed the egg yolks and sugar together and added a little flour and cornstarch until it was thicker. This was added to the hot caramel sauce to temper it slowly and then completely incorporated.
The caramel sauce and egg yolk mixture was cooked on the stove top again until it was nice and thick like the consistency of homemade pudding.
We left the cooked caramel "pudding" and the egg whites out to get to room temperature and took a dinner break. When we returned to making our dessert, we whipped the egg whites and added more sugar to make a meringue to create the airiness in the souffle. This is where I knew it would be tricky like the macarons I made last week as I didn't want to over mix the batter. I folded all the meringue into the caramel "pudding" and tried to make sure it was a smooth as possible without over beating. In fact, I probably could have mixed it in a little more.

The souffle dishes were filled almost to the top and we put them in the microwave for a few seconds as recommended to set the top of the batter so it would rise better.
I put the light on in the oven several times and we were SO excited to see they were rising!
We just had the caramel souffles on their own which was fantastic, but we were going to whip the remaining heavy whipping cream to have on the side. Martha's guest made caramel ice cream to have on the side, which would be interesting to try. We enjoyed some sweet Moscato wine that evening though and switched to some cold milk to have with our souffle as they were quite rich.
And, while a hot souffle isn't particularly easy to hold a candle, we put one in for the birthday girl.

Thursday, April 15, 2010

French Macarons


I've always admired french macarons when I saw them featured on different cooking shows and recently read about them on the Bakerella blog that I follow. That's where I was pointed to read this guide to making macarons that I reviewed several times before trying to make them (written by the author behind the Tartelette blog, another fabulous food blog). Macarons are gorgeous when colored to match their flavor and almost look too pretty to eat. In fact, I hadn't even tasted a french macaron until I recently went to Florida and sought out Le Macaron in St. Armand's Circle when I went shopping with my cousin. I ordered a french vanilla macaron and talked her into getting a chocolate one to try and we were both so pleasantly surprised at the chewy texture and amazing taste!


So, here's my first go at macarons! After reading the macaron guide and checking it against a few other recipes, I made sure I had all my ingredients. Some recipes call for almond flour instead of using blanched almonds that you ground yourself. But, after seeing almond flour in the grocery store for almost $11 and realizing it was just ground almonds, I decided to put my food processor to use and just make it myself. There are very few ingredients and while some recipes used typical cup measurements, I chose to weigh out all the ingredients as recommended in the macaron guide to make sure I was making it with the exact amounts indicated. So, here are the four simple ingredients: 50 grams of superfine sugar, 200 grams of powdered sugar, 110 grams of blanched almonds and 100 grams of egg whites (a little less than three egg whites).


I used my Kitchenaid to whisk the egg whites and superfine sugar together until I had this nice thick glossy meringue. I was worried I may have beat it too much, but it seemed to work out just fine.

I ground my almonds in the food processor to make my almond "flour" and mixed it in the processor with the powdered sugar. This was added to my meringue and carefully folded in together to make the cookie batter below. This is the really tricky part as if you mix it too much, your macarons will not bake properly, so I was hoping I did it correctly.

I had to make it complicated, of course, so I divided the batter to make some plain macarons and some chocolate macarons. I added a few tablespoons of cocoa powder to the batter for the chocolate version.
This was a handy tip from Tartelette to place the pastry bag with the tip in a tall glass to make it easier to spoon the batter in. I searched high and low for the right tip to use. Ateco 807 or 809 was recommended (a BIG plain tube tip), but I ended up finding the Wilton 1A tip to use that worked just fine.
I also got these new tips when I was at the bakery supply store and can't wait to try to decorate cupcakes or a cake using these!
I piped the batter onto Silpat lined baking sheets that were about 3/4-1" in diameter and ended up spreading to about 1 1/2" diameter and they had to sit until they hardened on top (about an hour).
They baked at a low heat (300 degrees) for about 12 minutes and I was excited to see that it looked like they were baking perfectly! They rose just a little to have the "feet" on the bottom and a nice smooth top.
All my chocolate ones did end up cracking a little bit. They still tasted great, but it must have been due to adding the cocoa and mixing the batter further.
Now that the cookies were baked, I made some filling to make the sandwiches. I chose to make a white chocolate ganache. I made the plain ganache and then added a little bit of raspberry jam (after I removed the seeds) for a white chocolate raspberry ganache. I could have just spooned this over chocolate or vanilla ice cream at this point!
I added the plain white chocolate ganache to the chocolate and used the white chocolate raspberry ganache for the plain macarons. I did make a little chocolate mint ganache as well, but I preferred the lighter flavor of the white chocolate. After I assembled all the macarons, I put them in the refrigerator to set. While they weren't perfect, it was my first attempt and I was quite proud of the way they looked and very proud of the way they tasted - yum! You would imagine these being crispy cookies, but they are so nice and chewy and soft on the inside and the different fillings really add to the taste of the cookies. Next time I make these, I'll try to make some different flavored cookies and fillings to experiment more.