Showing posts with label marzipan. Show all posts

Sunday, April 3, 2011

Cherry Blossom Cupcakes


I hadn't made any fun cupcakes in a while and was inspired by the cherry blossoms here in DC. It was wonderful and they were just as gorgeous as everyone says they are. So, here is my fun springtime take on a cherry blossom cupcake. 


I was going to make a cherry almond cake, but didn't want flavor overkill, so I just went with a vanilla cake. I had all kinds of fun flower and cherry papers that I had gotten in England last year so it was fun to have something to use those for.


I also decided to make two different sizes...little mini ones and standard size cupcakes. 


The frosting?  Real buttercream, of course and I made my usual vanilla buttercream with a cherry twist.  I used a few tablespoons of diced maraschino cherries and just one drop of Americolor soft pink gel food coloring. 


The maraschino cherries I found at Whole Foods are SO good.  They are organic ones that have no added color. It was nice to find some that aren't bright neon red and taste like they've been soaking in syrup. These actually seemed like fresh cherries with the stems still on and were already pitted (they were also $7 a jar).


I love how the frosting has little specks of red cherry in it.


I used already prepared marzipan (I know, slacker right?) for the little flowers on top. I have always made my own marzipan, but tried this one that I found at the store and it tastes amazing (and is much easier, of course).  I colored it pink with the same soft pink food coloring and used little candy pearls to press into the center of each marzipan flower.  My little marzipan cherry blossoms!

My little A tested a mini one for her snack this evening and loved it.  The rest are already packed to take to my fellow Washingtonians to enjoy at the office tomorrow.


Friday, November 12, 2010

Pumpkin Cupcakes


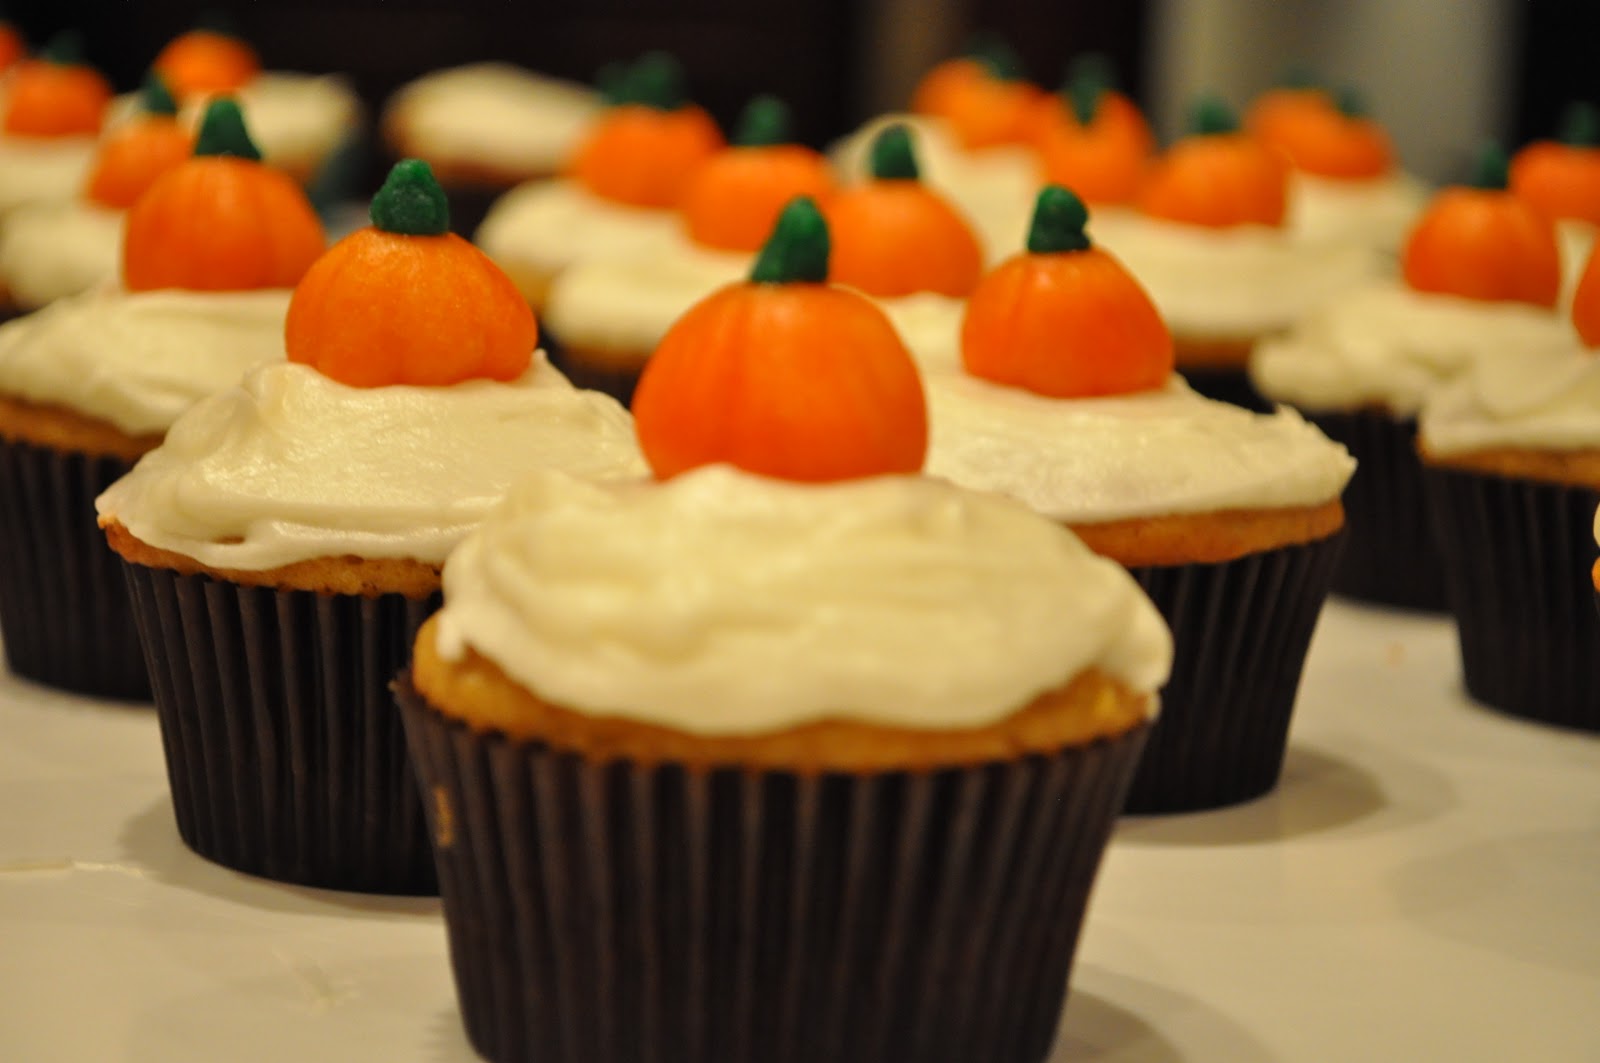
These pumpkin cupcakes were actually the other flavor that my friend wanted for her daughter's christening.  I've been wanting to do something this autumn with marzipan and thought the little pumpkins would be cute.  This is an idea I've seen a few places and is in the Martha Stewart Cupcakes book. I used that recipe for the pumpkin cupcakes, but did my marzipan pumpkins a little different, primarily as I don't have a leaf cutter that is that small.  I made cream cheese frosting to go with the pumpkin cupcake, but I made a triple recipe to be able to frost a few dozen cupcakes.  I have some leftover that I'll freeze to use later - maybe for red velvet cake for the holidays.

I reconstituted my marzipan with corn syrup after it thawed.  At first I thought I'd need to scratch it, but it ended up coming together after a lot of kneading.  I used Americolor Electric Orange and Leaf Green to color the marzipan for the pumpkin decorations.


They turned out nice and bright! I could've gone easier on the green. 

I don't have a tiny leaf cookie cutter, so I used this cutter and then snipped it into smaller pieces to use as the stem.

I rolled out the orange and cut it into pieces to have enough to put on all the cupcakes.

I rolled the orange pieces into little balls and set them aside on parchment paper so they wouldn't stick to the counter.


When I put them all together, I dipped the stem in a tiny bit of corn syrup to help it stick. Then I used a toothpick to put ridges on the sides of the pumpkins.


I love them - how cute!  I didn't take the time to carve a pumpkin this year, but I made my own!


A pumpkin patch of cupcakes...


Sunday, July 25, 2010

Jaffa Cupcakes


Aren't these the cutest little clementine oranges you've ever seen? They're not the real thing though. The real oranges are in the bowl in the background. These little cuties are made from marzipan! They were pretty easy and very fun to make. I decided to make these to top some cupcakes I was creating for my little brother's birthday.

He LOVES the English Jaffa Cakes which are these chocolatey-orangey (McVitie's terms) biscuits. We can find them in the U.S. now and I'm always buying him a box for his birthday or Christmas. We visited a cupcake shop together recently and he commented that nobody makes a chocolate-orange combination. So, I vowed to him that I would...and here it is! I made chocolate cupcakes with a homemade orange buttercream and topped them with my homemade marzipan crafted into tiny little clementine oranges.


Overall, they turned out quite good, but I did have a few hiccups (I mean learning experiences) along the way.
First of all, I think I filled my cupcake papers just a little too much. So, while they rose nicely and baked perfectly, they were a little too full and some of them stuck to the cupcake tin a little. They don't even look that full, but it's best to keep them only 1/2-2/3 full.


I also tried using these new cupcake papers called "If You Care." They are unbleached, which I thought was good and while I was trying to be a good environmentally conscious baker, they didn't work out so well. While they boast "better non-stick performance" that apparently not only meant they wouldn't stick to the pan, but also that the cake wouldn't stick to the paper. The cupcakes that I baked in these papers, were coming away from the paper and looked awful. I was lucky that I baked half of them in just plain white (yes, probably bleached) cupcake papers, but they turned out better (the one on the right).


Ok, so that's my venting about the cupcakes out of the way. Now onto the fun part - the little marzipan clementines.
I started with my smallest packet of frozen marzipan that I made from scratch earlier in the year. I thawed it in the refrigerator overnight and then let it come to room temperature the next day. As I did previously when I made the marzipan tulips, I reconstituted the marzipan using a little light corn syrup and it came together and was ready to mold in no time.
The first step was to make it orange, so I used an actual clementine orange as my subject and used AmeriColor Electric Orange (163) that was cut into the marzipan before I kneaded it. After having green and pink hands for a few days after coloring fondant for my birthday cake, I decided to wear some gloves to knead the orange color into the marzipan.

I was pretty happy with this nice bright orange color and molded it into a log first.

I cut the log into eight somewhat equal pieces.

Then, I cut each of the eight pieces in two and this was the size I used for rolling them into 16 little oranges.


One tip that I almost forgot about (and had to re-roll a few) was to place them on plastic wrap after molding them as it's pretty sticky.


I love this idea that I read about. To give the oranges their stem, I used whole cloves with the bloom from the middle removed.


Then they were rolled over my ceramic spice grater for the "dimpled" effect. However, I find that marzipan (especially homemade) has a little texture to it anyway from the ground almonds.

Here they are, my heaping bowl full of marzipan oranges. Now onto decorating the cupcakes...


I ended up making my own recipe for the orange buttercream. It ended up having a nice light orange flavor, but not too overpowering (see recipe below).
I piped on the frosting as I thought it would look nicer with the orange zest in it. While I definitely need to work on my piping skills (and am trying desperately to get into that course in culinary school), this was a little more difficult to pipe because it had a looser consistency with the orange juice I added in. Perhaps, I should have added a bit more powdered sugar to hold it together more, but it worked out just fine. I chilled the cupcakes overnight and it held together nicely. I just let them come to room temperature before I placed the marzipan oranges on top and served them.


While I learned a few things along the way, I was quite happy with my Jaffa cupcakes. My brother was too, but admitted that he felt I had gone through way too much trouble for him to just inhale it in less than a minute.
Recipe for Orange Buttercream:
2 1/2 sticks unsalted butter
4 cups powdered sugar
1 teaspoon pure vanilla extract
1-2 teaspoons fresh grated orange peel
4-6 tablespoons fresh squeezed orange juice
Beat the butter until light and fluffy. Add in the powdered sugar a little at a time and beat on low (so it doesn't fly everywhere). Beat in the vanilla and orange peel. Add the orange juice a few tablespoons at a time for taste and consistency. Note: I used a little over 6 tablespoons and it had a nice flavor, but the consistency was a little loose.

Tuesday, May 25, 2010

Featured in Sweet Bites!


My very own spring cupcakes with marzipan tulips were featured in the Sweet Bites newsletter by Bake It Pretty - my favorite online destination for inspiration and fun baking supplies. However random a happening it was that my cupcake photo was chosen along with only other two for the newsletter, I don't care. It was in there and it was directly under the cover of Jamie Oliver's new cookbook! Now that my eyes are healing, I'm planning to bake a few things this week. I think I'll try making Victoria sponge cake since my mum is visiting and will also try tackling homemade brioche.

Friday, April 30, 2010

Spring Cupcakes


I had found these pretty tulip inspired baking cups recently and thought I'd make some spring cupcakes to adorn with my pretty marzipan tulips and also try practicing some piping with some of the new pastry tips I found.
I used my favorite vanilla cake recipe from Billy's Bakery in New York. It's light and fluffy with a great vanilla taste. I made this same recipe for the vanilla cupcakes we had for Audrey's birthday party last year. It's very easy to make with mixing dry ingredients together and adding the wet ingredients to mix in the kitchenaid. It's makes such a glossy and smooth batter.
The recipe makes around 30 cupcakes and I filled all my tulips papers (it came in a pack of only 24) and also made an extra tray of 6 with some pretty pale pink papers. I considered these the test batch! When you put the batter in the tulip papers, the petals folded in a bit and looked so pretty!

Here they are out of the oven. They rose nicely and the only thing that annoyed me was you can see where the paper soaked in some oil from the batter, but the tips are dry. They also came out of the pans nice and held their own.

I made my favorite vanilla buttercream frosting and found it easy to not only put the pastry bag in a cup to fill it, but I folded the edge of the bag over the side of the glass so it wasn't as messy.


With the tulip papers, they probably weren't the best cupcakes to practice piping, but I was up for the challenge. I used a very large star tip and put a nice big swirl of light purple buttercream on top of each one. For the ones that I put the marzipan tulips in, I just spread some of the frosting on top so the tulip would stand out.


Thursday, April 29, 2010

Marzipan in Bloom


I first tried to make marzipan last month around St. Patrick's day. After some difficulty and several hours, I ended up with marzipan, managed to color it and ended up with some cute marzipan shamrocks. I had made such a huge batch of marzipan, that I tried freezing it (wrapped in both plastic wrap and foil). I was ready to try molding marzipan again and wanted to be a bit more creative. To go with the season, I wanted to make some marzipan tulips and had seen these in my new marzipan book. Easy, right? Well, since I already had the marzipan made, it wasn't too bad.


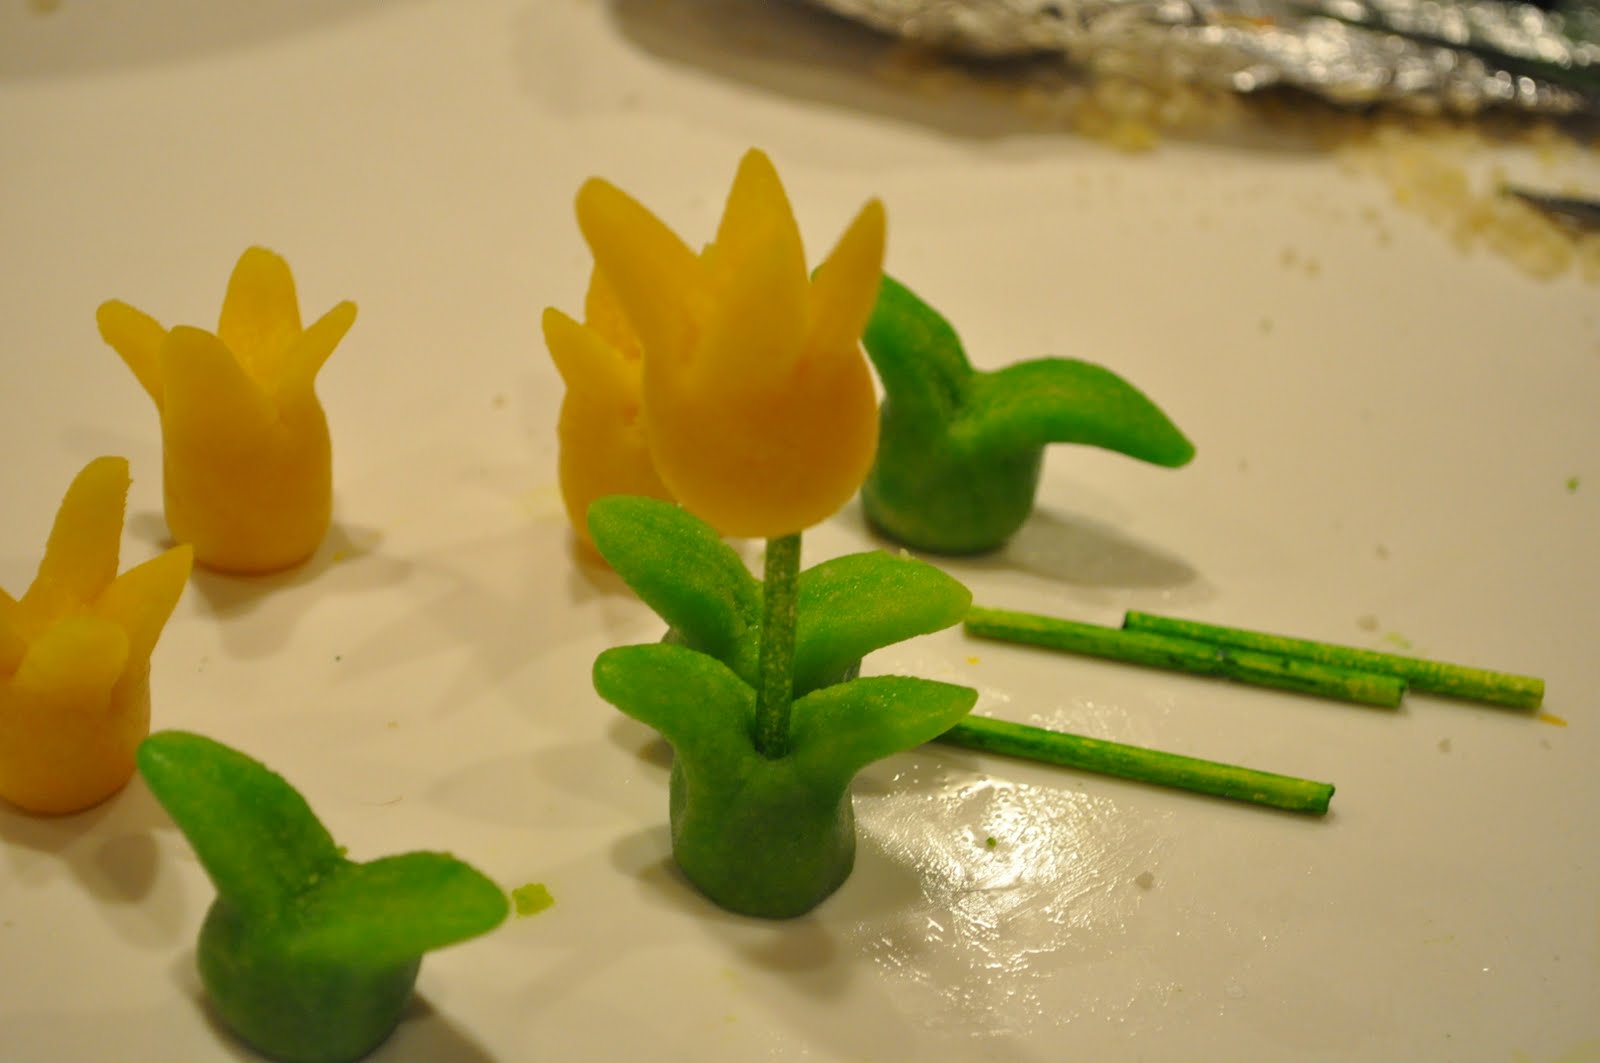
I read in another baking book on how you can reconstitute dried marzipan. And, while the marzipan froze quite well, it was a bit dry after it thawed. I used a little bit of corn syrup and kneaded it quite a bit until it was nice and moist and mailable. I started by coloring it the color I wanted my tulips to be and just went with a bright yellow. After the color was kneaded through, I started with a small tube shape.

The tube was cut with a sharp paring knife into equal pieces for each of the tulip flowers.
Then, you molded each piece into a nice smooth cone shape.
Then, I took a pair of sharp kitchen scissors to cut slits in the tip of the cone to make the petals. The book had the petals pointed in, but I molded mine out just a touch.
Here are all my tulips! Once I had accomplished this piece of it, I read on to see how I could do the leaves and stem to finish them off. I used another piece of marzipan to color green, made the cones again and only cut one larger slit to make two leaves.

For the stem, the book suggested using spaghetti noodles (a 3 inch section) to color with food coloring to match the stem. I thought this was ingenious, but was actually out of spaghetti, which I couldn't believe. So, I found some small lollipop sticks, cut them in half and colored them green with a pastry brush. It worked great!

I was so proud of my marzipan tulips and proudly displayed them on top of my spring tulip cupcakes (see next post). I have more marzipan in the freezer and fun plans for things to make coming up!